Live Sound Notes #1 - Signal Path, Cables and Connections
- Umut Yelbaşı

- Aug 24, 2025
- 9 min read
I finished a three-year Bachelor's degree as well as a Master's degree, and did a fair share of live sound events in different capacities, but every single time I worked at a gig I learned something I hadn't heard before. Learning genuinely never stops in sound engineering, partly because technology is always evolving, but mostly because there are so many things you can do in so many different ways, and a few things you have to do in a specific way because of physics or standards — like proper gain staging, impedance matching, or electrical safety. And I feel like everyone could use a memory refresh once in a while.
To help myself remember things and to maybe, hopefully, help other sound engineers in the beginning of their careers, I'm starting this Live Sound Notes series where I will be going through concepts I've come across during my experiences.
Signal Path
Quite possibly the most repeated phrase that I've come across both in education/training and in real life is "signal path". The signal path is how a vocalist's singing gets picked up by the microphone and ends up going out of the speakers, and things go wrong during that transfer all the time.
Below is a graphic from the Yamaha Sound Reinforcement Handbook showing a model of a sound system.

At its core, it's very logical. You have a vocalist singing into a microphone. The microphone (a type of transducer that converts acoustic energy into electrical energy) converts the vocals, or acoustical energy, into electrical energy so that it can travel through your signal processing units (preamp, mixing desk, outboard gear, etc) which is the point where you apply your EQ, compressor and any effects you want to have. This is also the point where mixing occurs.
Once your signal is in your desk, it passes through your desk's "channel strip", which is the series of effects that the signal goes through in order. This usually starts with a preamp.
On the preamp section of a channel, there is usually an input gain knob which provides gain on top of the existing, weak electrical signal to bring it to line level, which is the standard operating signal strength in professional audio systems, strong enough to be processed and routed without excess noise, but not yet powerful enough to drive speakers. This is the type of signal that typically flows through your recording system after the preamplifier stage and before the amplifier that powers your speakers.
Important:
There are two different line level standards: one for consumer use and one for professional use. Professional line level is around +4 dBu and can be found in equipment like mixing desks, preamplifiers, and signal processing equipment, which is what I'll cover here.
Next is usually the EQ and compressor, then FX, then the fader, which adjusts the gain of the signal after EQ, compressor and effects are applied. The fader controls how much of that channel’s processed signal is sent to the master bus (or subgroups / auxes). If the fader is all the way down, no signal is sent to the master output.
This new, modified electrical signal gets out of the desk through the output is sent to a power amplifier, which amplifies line-level signals to speaker-level signals, which is then sent to the speakers (transducers that reproduce sound) where it's converted back to sound, or acoustical energy.
Modern powered speakers often combine the amplifier and loudspeaker in one box, so the signal path can be shorter.Below is a graphic from the Yamaha Sound Reinforcement Handbook showing a basic sound system with three microphones, a mixing console/mixing desk, a power amplifier and a loudspeaker (the power amplifier is the part that is now embedded into modern speakers).

Just to quickly recap the different types of signals:
1. Mic-level signal: Signal with a weak voltage, generated by a microphone. Requires a preamplifier to be brought up to line-level.


2. Instrument-level signal: Somewhere between mic-level and line-level in terms of signal strength. Generated by an instrument, commonly from an electric guitar or bass. A preamplifier is required to bring the signal up to line level.


3. Line-level signal: Highest level signal before amplification. The signal type that flows through your system (typically) after the preamplifier and before the speaker amplifier. There are two types of line-level standards:
	A. Consumer-level: Around -10dBV and is what you’ll find in products like a CD player
	B. Pro-level: Around +4 dBu and can be found in equipment like mixing desks, preamplifiers, and signal processing equipment


4. Speaker-level signal: Post-amplification signals. After a line-level signal enters an amplifier, it exits to the speakers at what is called speaker level. These signals are much higher in voltage than line level and require speaker cables for safe signal transfer.
Balanced vs Unbalanced Connections
Your entire setup depends on your connections. The cables you use determine how your signal gets transferred across your system, and in a live audio environment, you want your signals to be as clean as possible.
Noise is your most annoying enemy. Your stage and venue are filled with devices that require electricity to work, which generate their own magnetic fields. You also have wireless devices that emit radio waves. As a result, your signals are faced with Electromagnetic Interference (EI) and Radio-Frequency Interference (RFI).
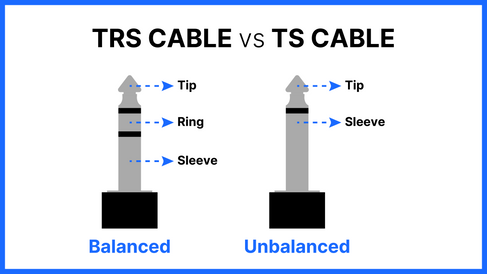
Unbalanced cables, such as TS or RCA cables, are completely susceptible to interference as they only have one conductor and ground. Any interference the signal picks up between the time it enters the cable and it exits it is carried over to its next input.
Balanced cables, such as XLR cables, are designed to reject interference over long runs.
They have two conductors that carry the same signal, but one of them will have its polarity reversed. Interference affects both wires equally, and once the signal reaches the mixer or DI, the conductor with the reversed polarity gets its polarity reversed again, therefore reversing the interference/noise signal. Now, instead of the two signals with opposite polarity cancelling each other out, the interference signals with opposite polarity cancel each other out and the signal reaches the other end without interference.
Below are some schematics of different kinds of balanced and unbalanced cables.


DI Boxes
Not everything you plug into your desk will be a microphone. Let's say you have a keyboard player with a synth. Keyboards normally output at line level, but they usually have an unbalanced output, which requires a jack lead, which needs to be converted into a balanced output to be plugged into a mixing desk. To do that, you will need to use a DI box and feed it into the desk’s mic input with a balanced XLR cable.

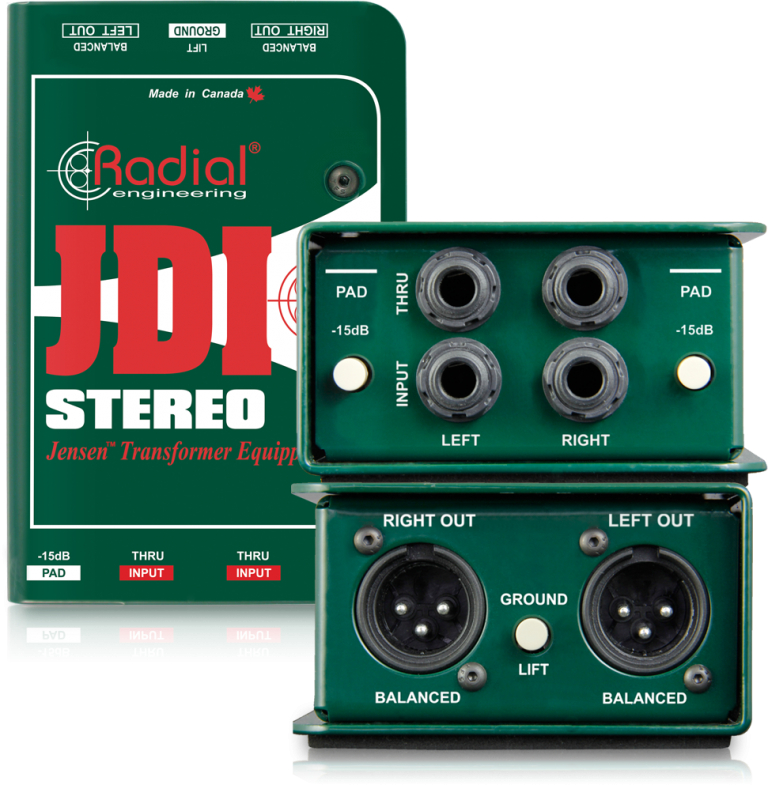
On the left is a passive DI box. Of the two boxes stacked on top of each other, the one on the top shows the input side, and the one on the bottom with the XLR output shows where the XLR cable that plugs into the desk will be connected.
The "15dB PAD" button on the top is an attenuator that reduces the input signal level. This is used if the signal level from the instrument is too high and/or unmanageable, and helps maintain a clean, undistorted signal.
The "Ground" button on the bottom box is a ground lift, which is used when there is a hum/noise coming from the instrument. This button breaks a ground-loop that can exist between the mains-powered equipment, which in turn causes electrical noise. When it is toggled, this hum (mostly) disappears.
ground loop
noun
an unwanted electric current path in a circuit resulting in stray signals or interference, occurring for example when two earthed points in the same circuit have different potentials; an earth loop
A good rule of thumb is to start with the ground lift inactive (i.e. the DI's ground connected). This ensures the DI chassis and the signal are properly grounded, and helps protect against electrical shock if something in the stage wiring or amplifier goes wrong. Grounding exists as a safety measure, and lifting the ground breaks the safety connection for the signal path. Most passive DIs are designed so the audio ground is lifted, but mains earth stays intact; however, it’s best practice to keep the lift off until you know you need it.
It's worth noting that if the hum or noise is caused by faulty pickups on a guitar or a similar mechanical fault, the ground button won't help.
The other two buttons, "Speaker" and "Rev 180" aren't standard across DI boxes, so I won't get into those here.
You might have noticed the "PASSIVE DI BOX" phrase on the box on the left. There are two types of DI boxes, active and passive. Although they essentially do the same thing, there are a few differences between the two.
Active DI Boxes | Passive DI Boxes |
Requires phantom power (48V) or batteries | Doesn't need power |
Contains electronic circuit (buffer/preamp stage) | Contains only a transformer |
Offer higher impedance, therefore suitable for low-output/passive instruments - Passive basses - Piezo pickups on acoustic instruments like violin, double bass, etc. - Vintage keyboards with passive outputs like the Wurlitzer or Rhodes) | Offer lower impedance, therefore suitable for high-output sources - Keyboards/synths - Drum machines - Active basses - Guitars with active pickups - Audio interfaces, laptops, DJ mixers - Samplers/grooveboxes |
Best for long cable runs and detailed capture | Best for shorter cable runs and strong, reliable signals |
The rule of thumb when choosing what type of DI to use is:
Passive instrument ➔ Active DI

Active instrument ➔ Passive DI
In a scenario where you have an electric guitar, a bass, a vocalist with an acoustic guitar with its own pickup, drums and a keyboard on stage, you would want to/could set up as follows:
Guitar: By plugging the guitar into the DI box and plugging in another jack cable into the 'thru' output, which sends the unaltered signal through the box, you can send the unaltered signal into the guitar amp instead of using a jack cable to directly connect the guitar and the amp. As this will also give you a balanced XLR output from the DI box, you can send that into the desk with an XLR cable. If you put a mic on the guitar amp and send that to the desk, you will have a DI guitar channel and a guitar amp channel, and you can use the two to get a fuller guitar sound.
Most modern guitar amps have their own DI or line outputs, in which case you can connect the guitar directly into the amp, and get your DI output directly from the amp's own output. You'll still be able to use the amp as a mic'd amp, therefore still having a DI channel and a mic'd amp channel. This introduces its own challenges in terms of the tone you're sending to the desk.
Acoustic guitar: If the acoustic guitar has its own pickup, you can connect it to an active DI box via an instrument cable (jack cable) and connect that DI box into your mixer via an XLR cable.
Keyboard: Assuming the keyboard is a modern one with an active output that outputs a line-level signal, you can connect the output into a passive DI box which is then connected into your mixer via an XLR cable.
In some cases, keyboard outputs have a stereo option, where you'll have an R (right) output and an L (right) output. On most keyboards there will be a "(mono)" label on one of these channels, which means you'll be able to use that channel's output as a mono channel alone. However, if you wish to have a stereo output, or if the artists needs it, you can use stereo DI boxes to do the same thing as before, but with two channels (which you can then pan right and left on the mixer). Of course you can also do this with two mono DI boxes.

Practical Cable Management & Stage Safety
No matter how well you understand signal flow or DI boxes, poor cable management can undo all your work. On stage, audio and power cables often run side by side, creating opportunities for hum, buzz, and interference. Here are some simple rules to follow:
Separate audio and power runs wherever possible. Even a few centimetres can make a difference in noise levels.
Use cable ties, gaffer tape, or snake boxes to keep cables tidy and avoid trip hazards. When using long cables, coil the unused part and leave at the foot of mic stands, tucked away from walking paths.
Label your cables with colour codes or numbered tags. This makes troubleshooting and stage setup much faster.
Check connectors and terminations before every show. Loose plugs, damaged XLRs, or worn jack leads are frequent causes of noise or signal loss.
If you end up not doing this, you should still be able to discover faulty cables during sound check.
Following these habits not only protects your gear but also ensures that your signal remains clean from stage to mixer.
The number of topics I could cover in live sound is unbelievably high, but I want to keep these notes bite-sized and straightforward, so each article will focus on a few core concepts at a time.
Next in the series, I’ll cover gain staging, a crucial concept for maintaining a healthy signal-to-noise ratio throughout your system. Proper gain staging helps your microphones, instruments, and DI boxes perform at their best and ensures your final mix is balanced and clear.


